How to Get SHA1 & SHA256 Keys in Google Play Console

Google moved the menu again. You need SHA1 and SHA256 fingerprints for Firebase, Google Sign-In, or Maps, and the old “App signing” breadcrumb no longer matches what you see on screen. The key fingerprints are still in Google Play Console. They just live under Protected with Play now.
This guide shows exactly how to get SHA1 and SHA256 in Play Console with the current layout. You will know which certificate is which, what to paste into Firebase, and where MD5 fits in if a tool still asks for it.
Why You Need SHA1, SHA256, and Sometimes MD5
Android apps are signed with a signing key. Services like Firebase, Google Sign-In, and the Google Maps SDK do not read your JKS file directly. They want a fingerprint: a short hash of your public certificate so Google can trust builds that match your Play listing.
| Fingerprint | Typical use |
|---|---|
| SHA-1 | Firebase, legacy Google APIs, OAuth client setup |
| SHA-256 | Newer Google services, Play Integrity, some SDK checks |
| MD5 | Older docs or third-party dashboards (less common on Play now) |
If Google Sign-In works in debug but fails after you ship to Play, you often pasted the upload key fingerprint while users install builds signed with the app signing key (or the reverse). Play Console shows both so you can register the right one in Firebase.
That context makes the new menu path easier to follow.
Before You Open Play Console
You need three things ready.
A published or draft app in Google Play Console tied to the package name you use in Firebase (for example com.yourbrand.app).
Owner or admin access to the app. Fingerprint pages are not visible to every read-only role.
Your Firebase project (if that is why you are here) open at Project settings → Your apps → Android app, where SHA certificate fingerprints are added.
If you built your Android package with WebInto.app and followed our Play Store upload guide, you already uploaded an AAB signed with your upload key while Google holds the app signing key. Play Console is the source of truth for both fingerprints after that.
How to Get SHA1 and SHA256 in Google Play Console (Current UI)
Google grouped signing tools under Protected with Play. The steps below match the updated console; menu labels may shift slightly, but the path stays: Protected with Play → Play Store Protection → Manage Play App Signing.
Step 1: Open Protected with Play
Sign in to Play Console and select your app. In the left sidebar, open Protected with Play (sometimes shown near release or policy sections depending on your account).
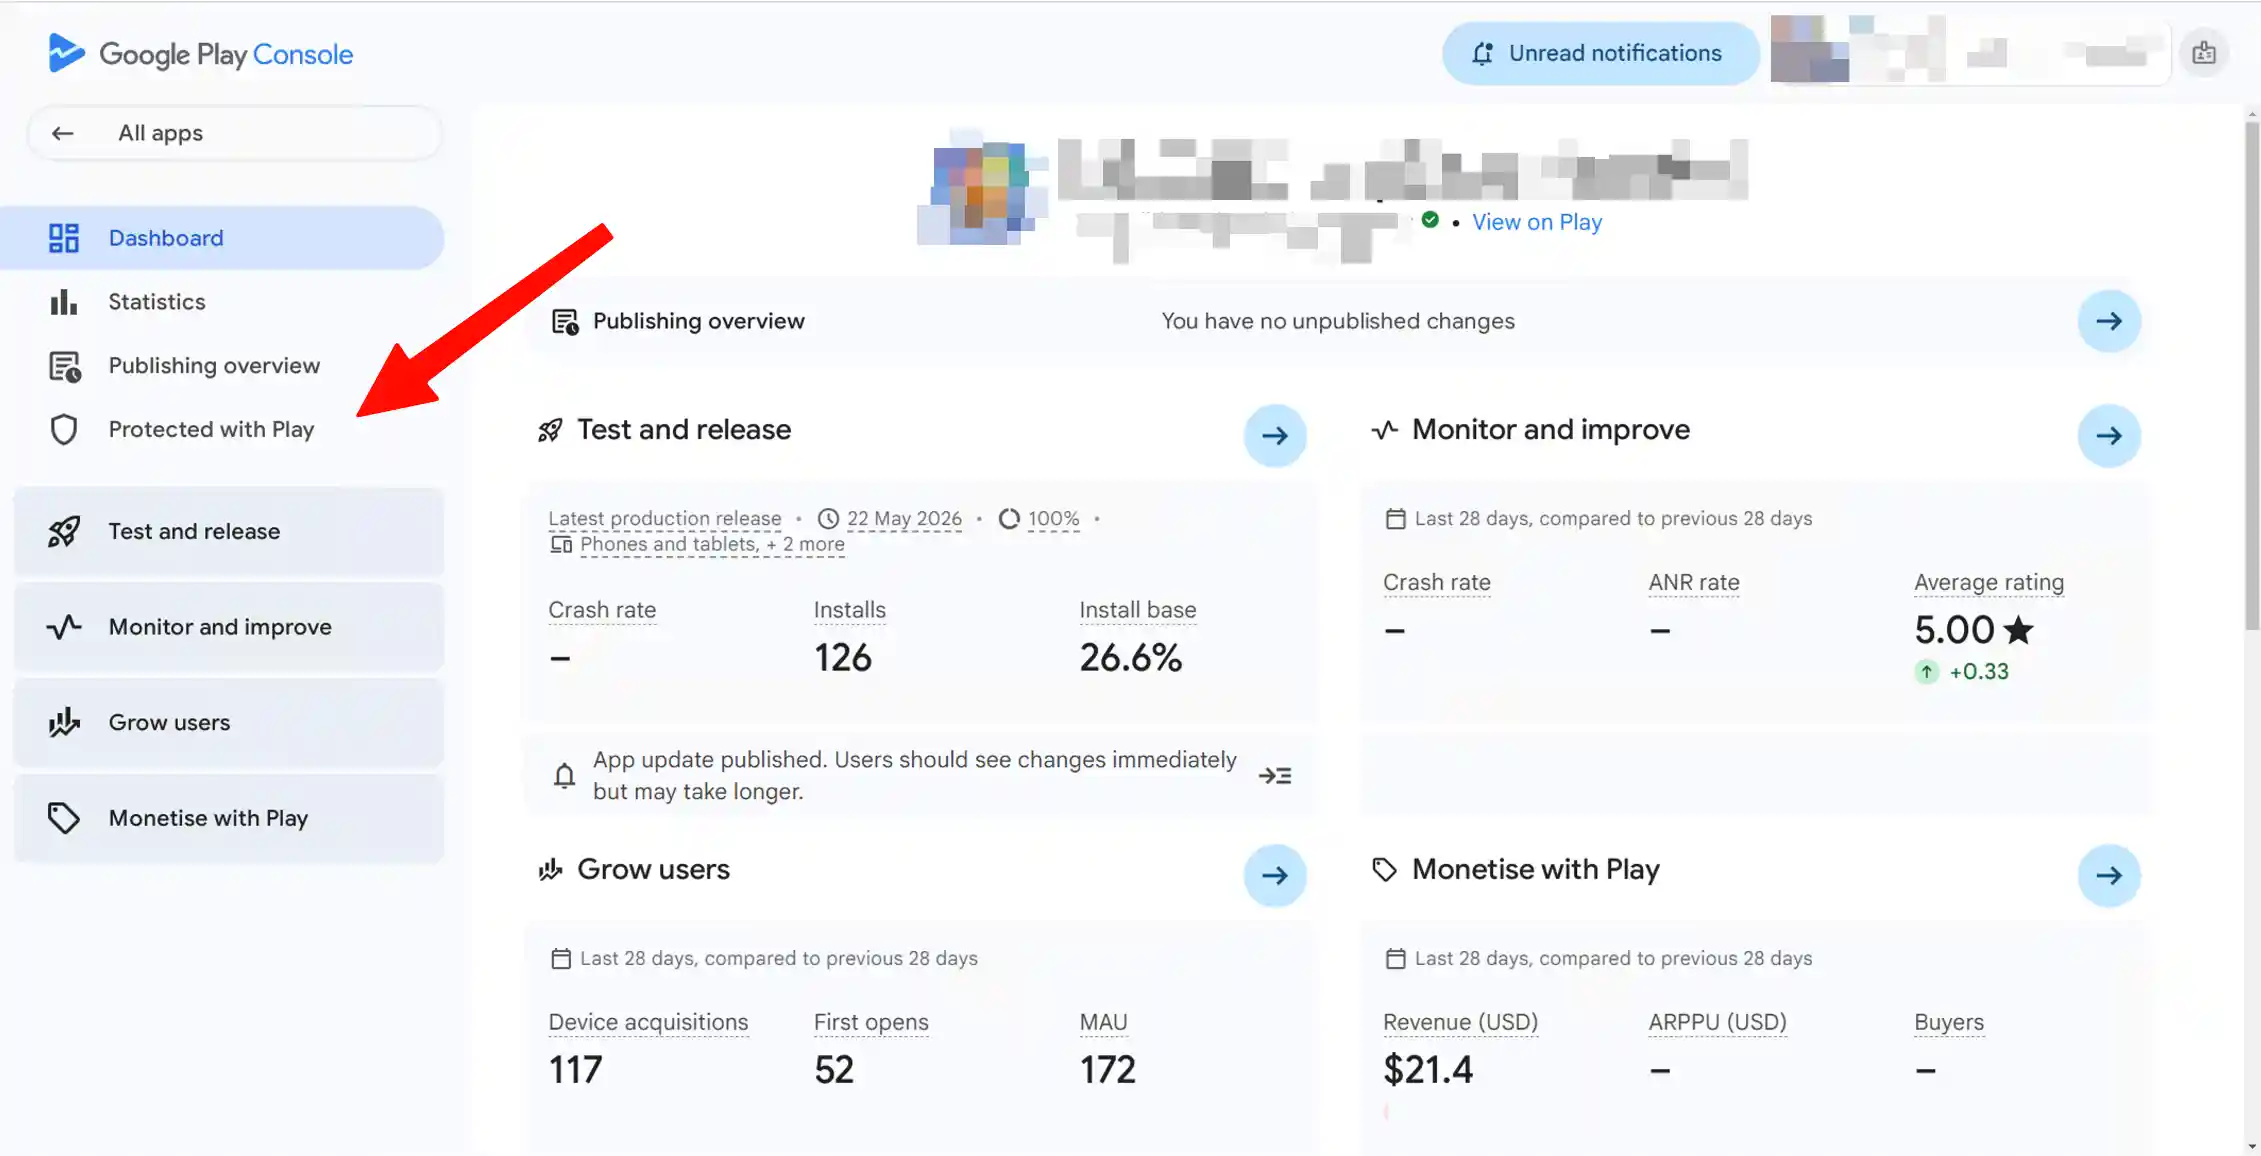
Select your app first, then use Protected with Play in the left navigation.
Step 2: Open Play Store Protection, then Protection
Under Protected with Play, expand Play Store Protection if it is collapsed. Click Protection (the section that covers signing and distribution safeguards).
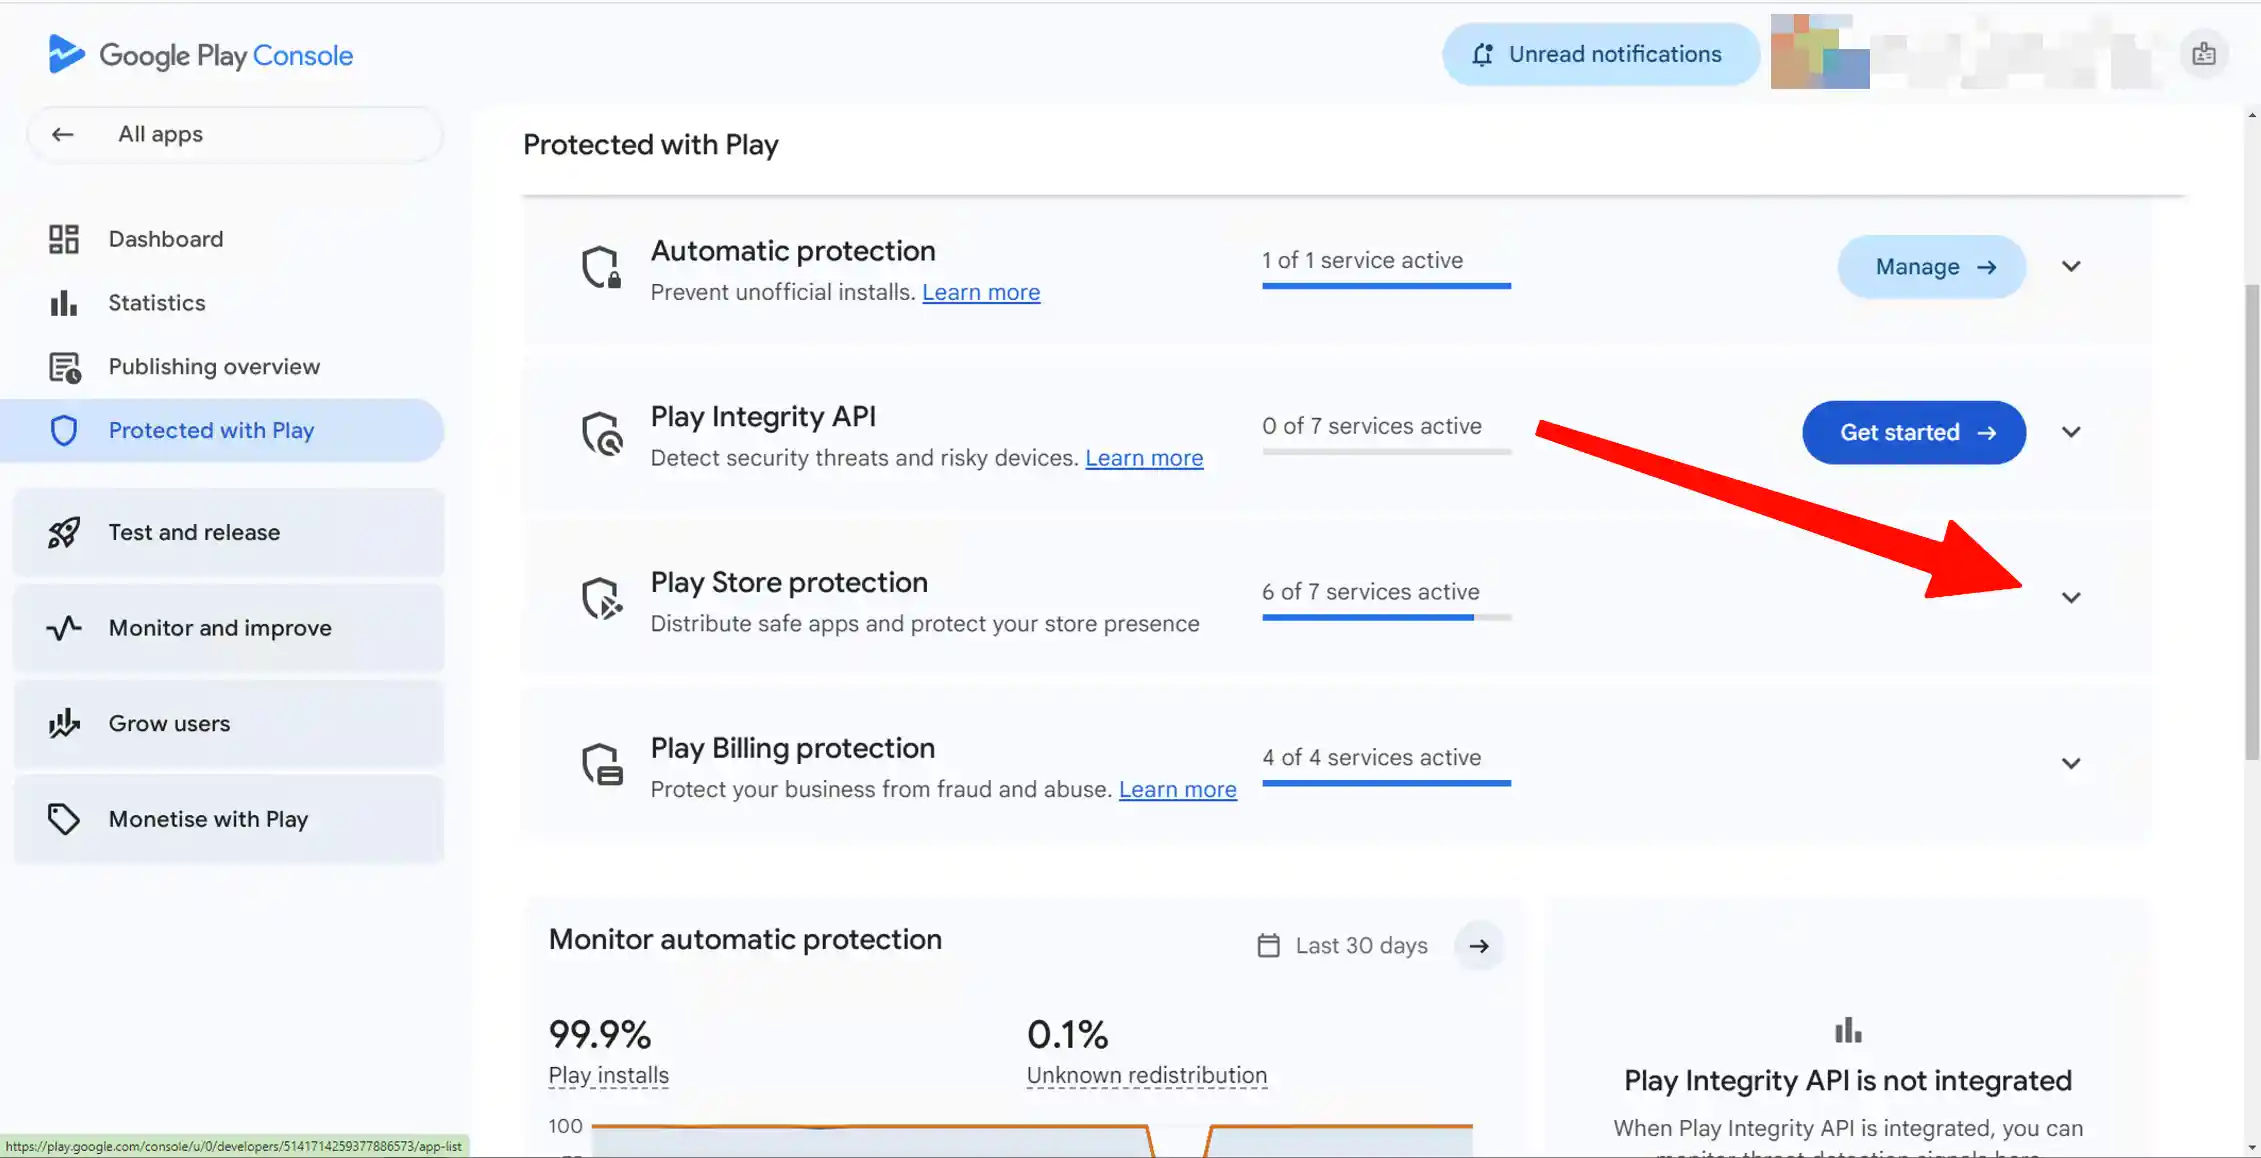
Expand Play Store Protection, then open Protection to reach signing settings.
Step 3: Manage Play App Signing
On the Play Store Protection dropdown, find and click Manage Play App Signing. This opens the page where Google lists certificates and fingerprints.
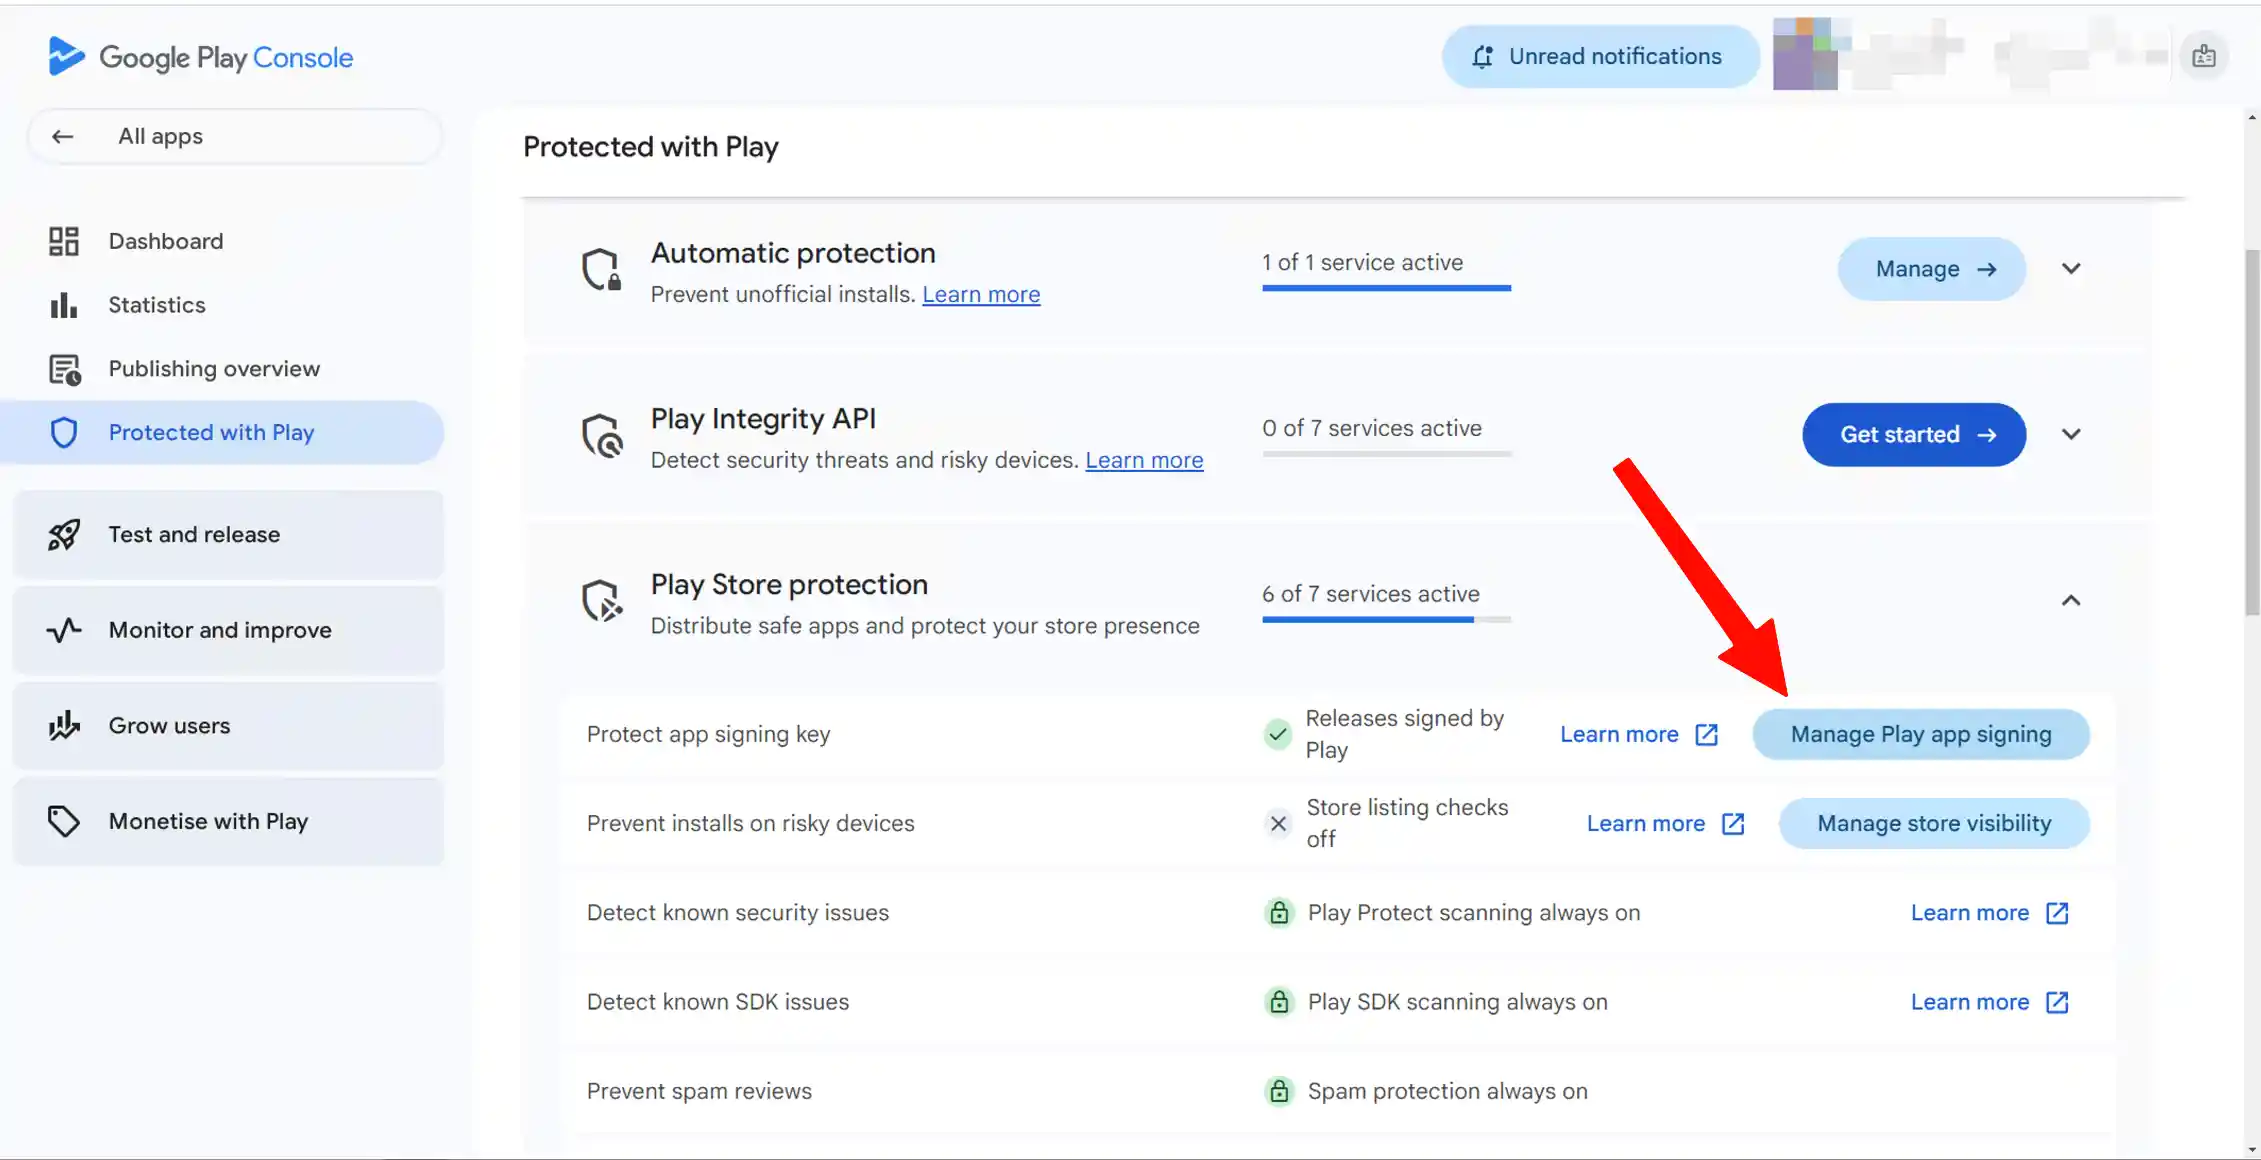
Use Manage Play App Signing to view certificates and fingerprints.
Step 4: Copy SHA1, SHA256, and MD5 fingerprints
You should now see App signing key certificate and Upload key certificate (wording may vary). Each block lists SHA-1, SHA-256, and often MD5 with a copy icon.
- App signing key certificate: fingerprints for builds Google re-signs for Play Store users. Use these in Firebase for production Google Sign-In when you enrolled in Play App Signing.
- Upload key certificate: fingerprints for the key you use to upload AAB files. Add these too if you test internal tracks signed with your upload key.
Copy the values into Firebase without colons if the field rejects them, or keep colons if Firebase accepts the full string (both formats appear in docs; match what the Firebase form shows).
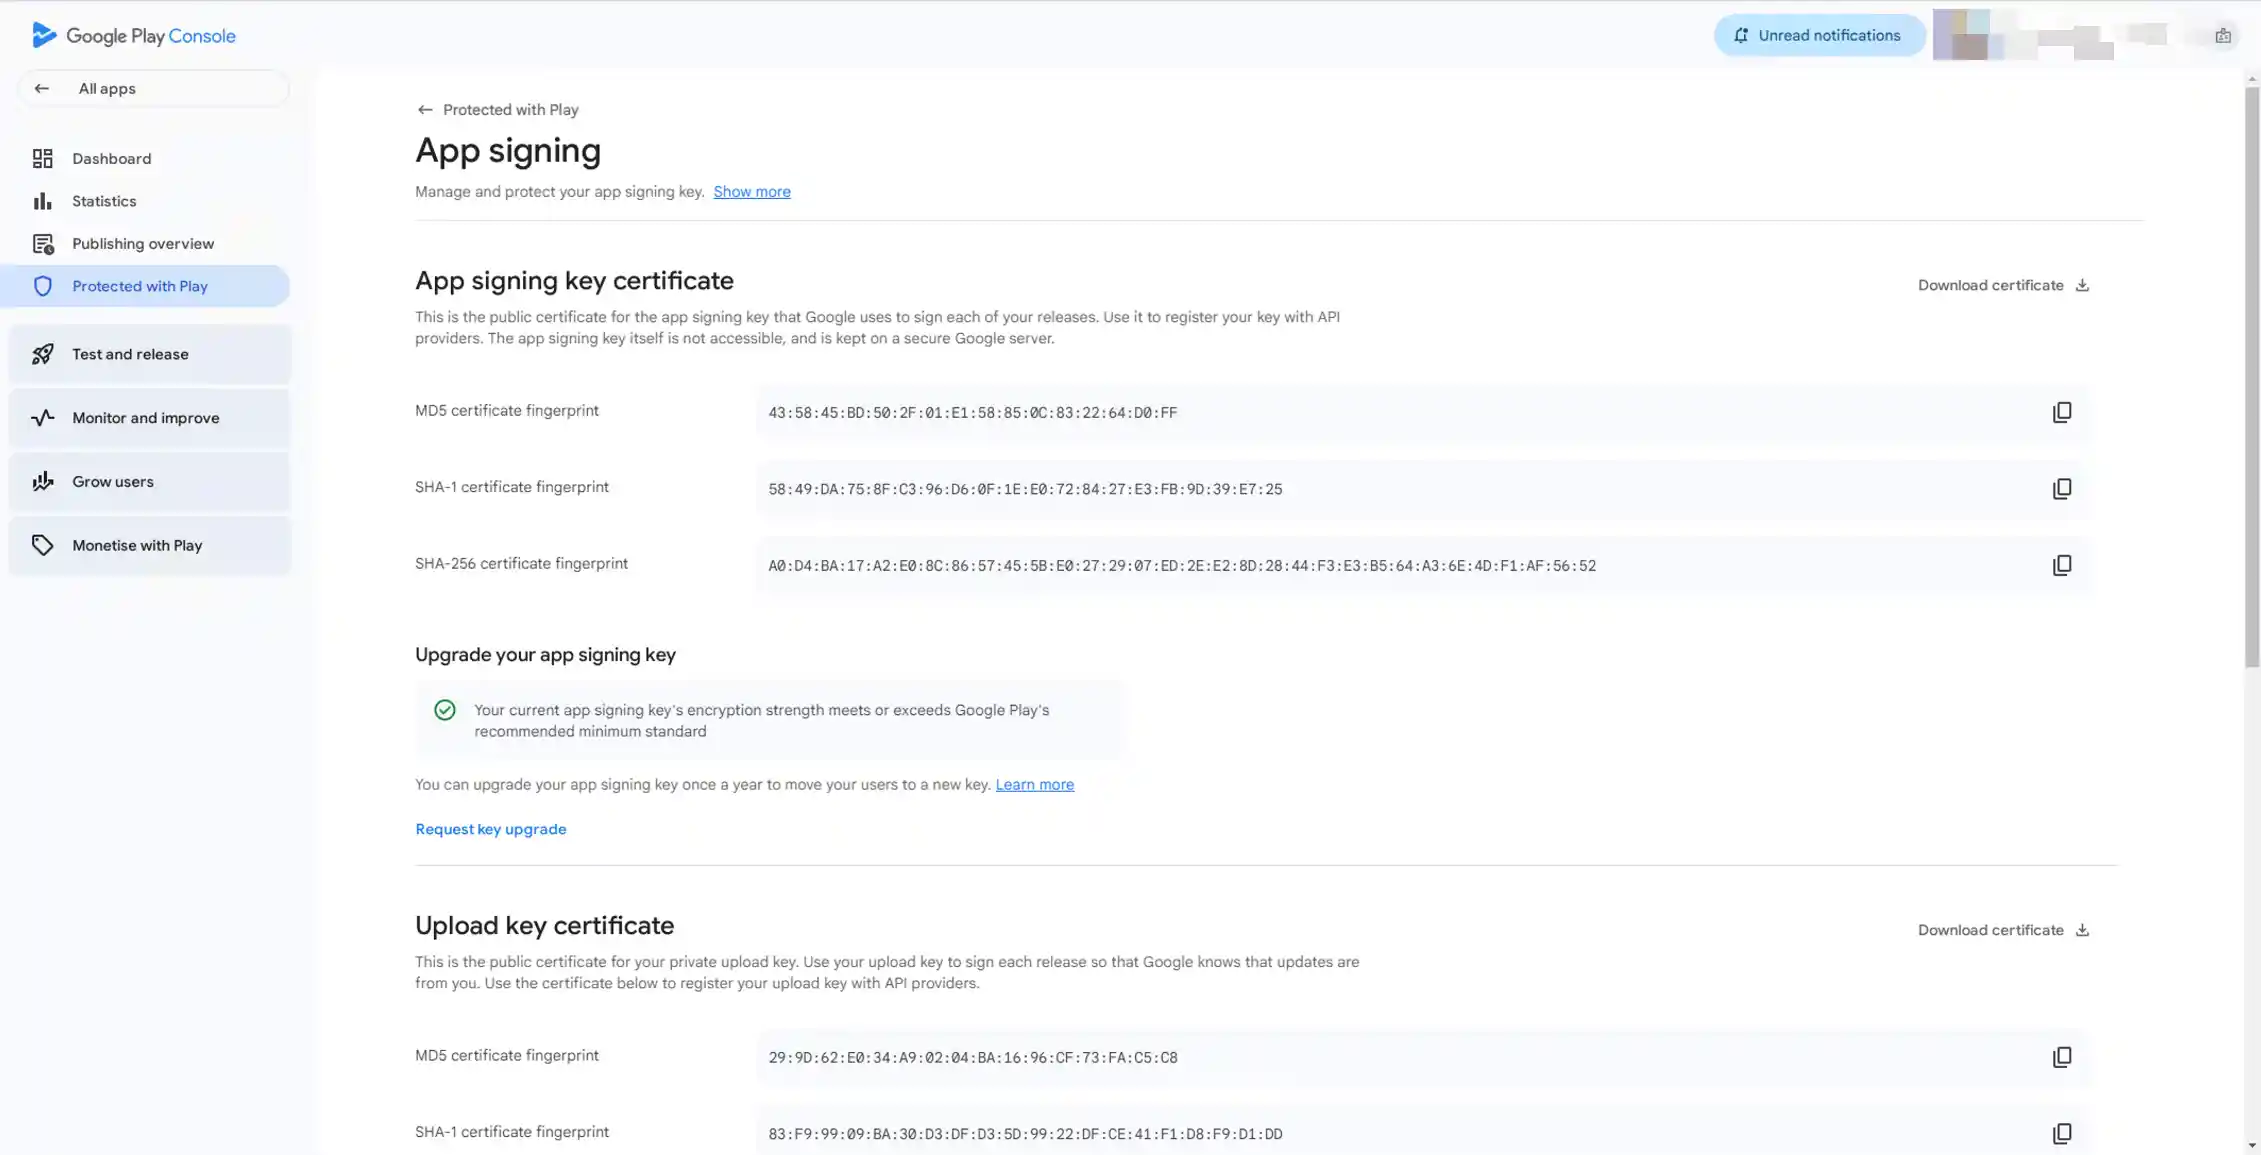
Copy SHA-1 and SHA-256 from the correct certificate block (app signing vs upload).
That is the full path for key fingerprints after the UI change. Next, wire them into Firebase.
Add Fingerprints to Firebase for Google Sign-In
Open the Firebase console, choose your project, and go to Project settings (gear icon). Under Your apps, select your Android app (package name must match Play and your APK or AAB).
Scroll to SHA certificate fingerprints and click Add fingerprint. Paste the SHA-1 from Play Console first, then add SHA-256 if the console offers a separate field or you are following current Firebase docs.
Download the updated google-services.json if Firebase prompts you, and rebuild or redeploy your app so the config is bundled. For Google Sign-In, also confirm the OAuth client in Google Cloud Console lists the same package name and fingerprints.
Practical rule: If login fails only on the Play Store build, add the app signing key SHA-1 and SHA-256. If it fails on a local release signed with your upload key, add the upload key fingerprints as well.
App Signing Key vs Upload Key (Quick Reference)
| Certificate in Play Console | Who holds the private key | When to use the fingerprint |
|---|---|---|
| App signing key | Google (Play App Signing) | Production users, most Firebase production setups |
| Upload key | You (your JKS or builder) | Uploading AAB, internal testing before Google re-signs |
If you lose your upload key, Play Console has a reset flow; the app signing key stays with Google. Store your JKS and passwords safely when you generate them, as described in our web to app build guide.
Understanding both rows on the fingerprint page prevents the “I added SHA1 but Sign-In still fails” loop.
If You Do Not See Fingerprints Yet
No app uploaded: Upload at least one AAB to an internal or closed track so Play can register signing certificates.
Wrong app selected: Confirm the package name in the top bar matches Firebase.
Permissions: Ask an account owner to open the page or grant you admin access.
Still on legacy UI: Search Play Console help for “app signing certificate” or use the console search box for Play App Signing. Google sometimes rolls menus out gradually.
Once the certificates appear, the copy buttons are the fastest path; you do not need to export MD5 from a local JKS unless you are debugging an old integration.
Conclusion: SHA1 and SHA256 Live Under Protected with Play
Google Play Console still exposes SHA1, SHA256, and MD5 for your signing key and upload certificate. After the layout update, go to Protected with Play, open Play Store Protection → Protection, then Manage Play App Signing to copy key fingerprints for Firebase or other APIs.
Add both app signing and upload fingerprints when in doubt, paste them into Firebase, and retest Google Sign-In on a Play-installed build. If you are still preparing your first release, pair this with our how to upload on Google Play checklist so your AAB and signing setup stay aligned.
FAQ
Where did SHA1 go in Google Play Console?
SHA-1 is on the Play App Signing page under Protected with Play → Play Store Protection → Protection → Manage Play App Signing. Google moved signing tools out of older “Release” menus; the fingerprints themselves did not change.
Do I need SHA1 or SHA256 for Firebase Google Sign-In?
Firebase still commonly asks for SHA-1 for Android OAuth. Adding SHA-256 is recommended when the console shows both fields, because newer Google APIs prefer it. Register fingerprints for the certificate that actually signs the build users run (usually the app signing key for Play Store installs).
What is the difference between app signing key and upload key fingerprints?
The upload key signs the AAB you upload. Google re-signs store builds with the app signing key. Fingerprints differ if those keys differ. Firebase must list the fingerprint for the key that signed the binary on the device you are testing.
Can I get SHA1 from my JKS file instead of Play Console?
Yes. Tools like keytool -list -v -keystore your.jks print SHA1 and SHA-256 locally. For Play Store production, Play Console’s app signing key row is still the reliable source because Google may hold that key even when you only know your upload JKS.
Why does Google Sign-In work in debug but not from the Play Store?
Debug builds use your debug keystore fingerprints. Play builds use app signing certificates. Add the Play Console SHA-1 (and SHA-256) from the app signing key certificate to Firebase, download fresh config, and ship an updated build.

Ready to start?
Convert your website into an Android app
Install WebInto.app and build your APK in minutes. No coding required.